9 944
Cardboard animals. A brown corrugated cardboard box is a great source of entertainment (and not just for the cat that climbed into it and caught its tail there). Cardboard can serve as an excellent material for creating a whole puppet world: cardboard animals, cardboard trees for a winter fairy forest, and the trees themselves are also made of cardboard.

We need just nothing, namely:
- Cardboard.
- White sheet of paper.
- Glue, scissors or carpet knife, black felt-tip pen.
- template (download PDF here)
- See what are
Let's start with firs. To create a three-dimensional Christmas tree, we simply draw on cardboard, two Christmas trees in the most childish way a Christmas tree (from three triangles), both of the same size. The only secret of the two halves of the same Christmas tree will be slots as wide as the thickness of the cardboard, up to the middle of the layout. In the first novelty, a slot is made from the base to the middle, in the second from the top to the base. We imitate a snow cap on top of trees with paint, or by gluing white paper. We connect both halves. how to do this, I think it’s clear, the whole Christmas tree is ready.


Cardboard animals are made according to the same principle. Toy parts are connected according to the same principle using slots in the component parts.
The torso is drawn separately, legs, horns, ears are drawn separately. The legs are just a piece of cardboard, cut out in the shape of a horseshoe, the right size, height and width. We cut out the horseshoe, make a slot from the middle of the upper arc to the middle.
Where the legs are attached to the body, we make a reciprocal slot of the same thickness. The horns are also attached. It remains to connect the details, you can first color the animals from cardboard, or apply an application (specks on the paws on the sides, eyes).
Making a sled for a dog sled is also not a difficult task, two sidewalls and a couple of crossbars, everything is connected with slots.


Add dolls, and you can play.
Colored paper is an excellent material for crafts. You can make applications, various figures and many other creative things from it. In this article we will consider: how to make crafts from colored paper for primary school children with their own hands.
You will need: thick colored paper, glue gun, ruler, scissors, adhesive tape, stationery gum, pencil, pen spring.
Master Class
- Take a sheet of paper and a pencil, twist the tube diagonally from the corner, then fix it with tape and pull out the pencil.

- Twist the second sheet of paper around the first tube, then pull them apart. The second paper tube should be slightly larger in diameter than the first so that it can be fired from in the future.
- Fix the second tube with tape, then cut off the edges.
- Twist 2 more paper tubes in the same way.
- Cut the tubes into segments of this length: trunk - 2 tubes 15 cm long; handle - 7 tubes 5 cm long; trigger - 1 tube 8 cm long.
- Glue 5 cm tubes diagonally to make a handle.

- Glue the 8cm tube on top of the handle so that the remaining 3cm protrude to the right. This is a trigger.
- Glue two 15cm tubes together and glue to the top of the gun as a barrel.
- Twist two thin tubes from yellow paper.
- Bend the thin tube into a "U" shape and insert one end into the trigger and the other end into the top tube of the handle. Cut off the excess. This will be the trigger.
- Make a trigger guard from the second thin tube. To do this, place one end of the tube in the handle (in the second tube from the top) and glue the rest of the tube to the bottom of the barrel.

- Twist the pink paper tube, flatten it and tape the handle as shown in the image. It is worth noting that the rear hole in the trigger must be open.
- Remove the trigger from the top tube of the handle and insert the spring. It is worth noting that the spring should rest against the tube covering the back of the handle. Reinsert the trigger.
- Twist a thin thick tube of yellow paper, secure with tape and cut off the edges so that they are even.

- Bend the edge, put on an elastic band and fix with glue.
- Insert the tube with the rubber band into the down tube of the gun barrel and pull the rubber band forward, hooking it between the two tubes.
- Roll up bullets out of paper, load the gun and shoot.
You will need: colored cardboard, scissors, glue stick, cotton wool, stapler.
Master Class

The rainbow in the clouds is ready!
Binoculars
You will need: yellow cellophane, scissors, adhesive tape, black paint, brush, green and black paper, glue, rubber band, wine cork, string or elastic band.
Master Class
- Cut out 2 circles of yellow cellophane and stick with tape on the circumference of the bushings as binocular lenses.
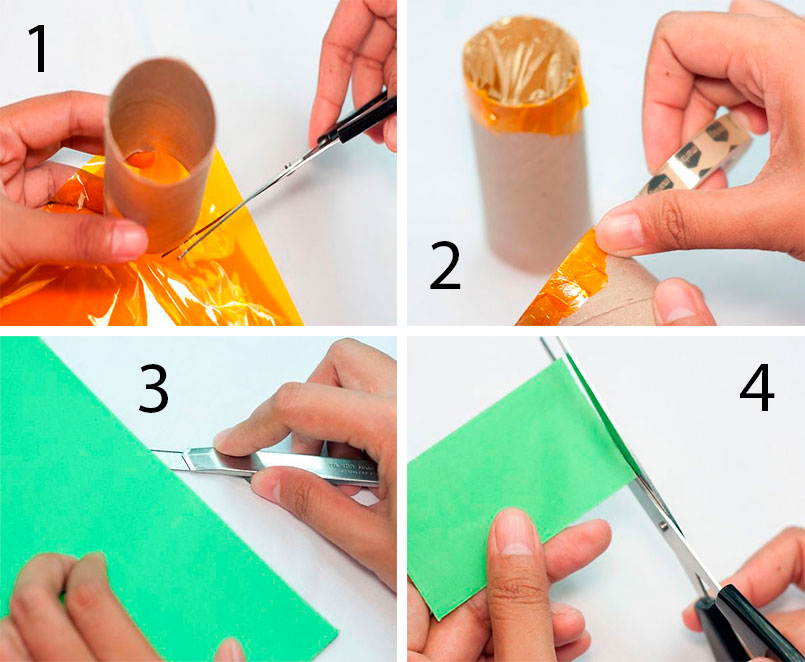
- Paint the circumference of the wine cork with black paint and cover it with green paper.
- Tape the sleeves with green paper and glue the black stripes as shown in the image.

- Glue the bushings together and fix by putting on a clerical gum. After a while, remove the gum.

- Glue the glued cork between the bushings.

- Prepare an elastic band or rope of the desired length, make a hole on the side of the bushings and fasten the elastic band.
Binoculars are ready!
Origami rose
You will need: double-sided colored paper, scissors, a simple pencil.
Master Class
- Fold a sheet of colored paper diagonally as shown in the photo and cut off the excess strip to make a square.
- Bend the square to form a second diagonal.

- Bend the square in half to form lines like a snowflake.
- Move the sides of the workpiece in this way: the top - from the right side to the left, and the bottom - from the left to the right, to make a triangle.
- Bend all 4 peaks to the middle and run your fingers along the folds.
- Expand the workpiece to a double triangle and fold the top corner back.

- Spread the bud and bend the folded corner inward.
- Gather the double corner back and run your fingers through the folds.
- Raise 4 side corners to the top.

- Flip over, then fold each side to the center to the middle. You should get a blank with a hole at the bottom.
- Blow strongly into the hole from below to straighten the bud.
- Twist the petals using a simple pencil.

- Take the strip of paper cut off at the beginning.
- Fold the stem and insert it into the bud.
The origami rose is ready!
Moving 3Dfish
You will need: colored paper, scissors, glue, pencil, black felt-tip pen.
Master Class
- Take a sheet of blue paper and make a square.
- Fold the sides to the fold line, then open the paper.

- Fold the paper in half in such a way that you get a triangle, as shown in the image.
- Make cuts along the fold line, then open the paper and glue the overlapped parts that are not cut.
- Flatten the fish's face by cutting off a corner.

- Cut out the fins and tail from the pink, then draw stripes with a felt-tip pen.
- Cut out the eyes from white paper and draw the pupils with a black felt-tip pen.

- Glue the fins, tail and eyes, also do not forget to draw eyelashes.

- Cut out an elongated semi-oval and glue it as the lower jaw.
You will need: a sheet of colored paper, a felt-tip pen and scissors.
Master Class
- Fold a sheet of colored paper in half.
- Place your palm on the piece of paper so that the thumb and forefinger touch the edge of the piece of paper, thereby forming a half heart.
- Circle your palm.
- Cut out the palm and unfold the craft.
The heart in the hands of colored paper is ready!
You will need: colored paper in white and yellow, a simple pencil, ruler, glue, coin or compass.
Master Class
- Cut 9 strips of paper to the same size.
- Make 2 circles on yellow paper.
- Cut them out.
- Glue the ends of the strips to form petals.
- Glue the petals to the yellow circle, then glue the second circle on top.
You will need: red colored paper, a simple pencil, scissors, a round object.
Master Class
- Trace a round object on colored paper.
- Draw a spiral in the circle.
- Cut out the circle.
- Cut the spiral in such a way that you get a "spring"
- Twist the rosette, in the same way make the desired number of roses.
Original colored paper roses are ready! I recommend watching the video tutorial!
You will need: double-sided colored paper, glue gun, stick or skewer as a stem, button.
Master Class

A creative flower made of colored paper is ready!
You will need: 4 sheets of colored paper, double-sided tape.
Master Class
- Fold each sheet into an accordion.
- Fold each harmonica in half to form a fan.
- Glue 4 sheets together in such a way that you get a circle.
A fan flower made of colored paper is ready!
You will need: colored paper, stapler, cut out butterfly (from a magazine, notebooks, pictures), felt-tip pen.
Master Class

A case for surprises made of colored paper is ready!
You will need: colored paper in black and yellow, a simple pencil, scissors, ruler, glue, compasses, sequins.
Master Class

Colored paper owl is ready!
You can also make a cute bunny out of colored paper, but see how in this video!
colored paper sisters
You will need: paper of two colors, 2 wooden sticks, buttons for the eyes, rubber bands or ropes for hands, pencil, glue.
For the development of a child's creative abilities, it is better to start creating original crafts together with your mother (grandmother). It is more interesting for children to make various crafts of animals and birds with their own hands.
Useful creativity
Adults will better understand their children and teach children patience, attentiveness and beauty. You can choose any technique: modeling, appliqué, quilling, beading, knitting, origami, etc.

It will take experience and perseverance to make beaded animal crafts, this is an activity for elementary school girls. Any activity develops the motor skills of the child's hands and creative thinking.

Piglets from large plastic bottles
This is an excellent decoration of the garden plot, it is resistant to bad weather, pets are not afraid of it. We will analyze crafts on the theme of animals.

It is better to take a large bottle of 5 liters, but any plastic bottle will do. It is necessary to paint it with waterproof pink paint to imitate a small pig.

Where the lid is a muzzle, large eyes are required (blue, lilac or green eyes on a white background) with black cilia.

The lid is the piglet's snout, draw 2 dark spots.

At the top, the bottle must be cut symmetrically from 2 sides in order to insert large pointed ears (from another container).
It is better to make a small flower bed out of a pig, so you need to cut out plastic in the shape of a rectangle (square) in the center of the bottle. Pour soil inside and plant flowers.


It is better to make an animal corner on the site, for example, 3 funny pigs, next to a swing or a bench.
Funny hedgehog made of yarn
Necessary materials:
- thick paper for the base;
- some yarn for needles;
- picture of an apple or fungus;
- glue and scissors.

Cut out the base of the product of the desired size from cardboard or thick paper. It resembles a large drop, where the “tail” is slightly turned to the side. Cut out the body according to the scheme.

To work, you need a little dark yarn in gray, brown or black. You can take a bright shade of thread or contrasting colors, then the hedgehog will be even happier.

Cut the threads of the same length 2-5 cm, focus on the size of the hedgehog itself.

Start gluing the "needles" from the outer circle, as in the figure. 2nd semicircle (leave the muzzle empty) with glue a little closer to the center. Rows should fit snugly together. See that the hedgehog is with thick needles, and not bald.

We glue a black nose, you can have rosy cheeks, a small eye. 

Glue an apple (fungus) on needles for resemblance. Hedgehog is ready!

Below is a diagram of crafts for various animals to choose from.
Colored paper bird yard
Great idea for kids. According to the stencil, you need to cut out the base of the paper.

We fold the colored sheet in half in length, and make parallel cuts with scissors (not completely!).

Separately prepare the eyes and scallop, beard, beak for the cockerel and hens.


A spectacular volume is given by folding the base (body) of a cockerel or hen, fixing it with glue.

Glue the details on the finished product: comb, beak and beard, then the eye.

Similarly, we cut out other inhabitants of the private yard: ducks, geese, chickens. Such creative volumetric crafts of familiar animals will make the manufacturing process more fun.


Crafts of animals from disks
Easy crafts from disks are a good gift for mothers, grandmothers or friends for the holidays.
Ladybug
Seal the entire disc with black cloth. At the bottom, ready-made small eyes with glue, you can use white circles with black dots.

A black stripe should run vertically upwards from the peephole.


Glue the red fabric at a small distance of a friend a little more than ¼ circle in size onto the disk.

A few black circles on a red background are spots on the wings. Ladybug is ready!
fish
Here you will need 2 disks, colored paper and ready-made big eyes.

According to the template, we cut out the mouth of the fish, the upper large fin, the lower one is small, and the tail.

All of the above parts are glued into place between 2 disks.

We fold a sheet of colored paper with an “accordion” and insert it into the central hole of the disk - these are the side fins.

It remains between above the mouth to stick the eyes. The fish is ready!

We offer interesting ideas on the photo of animal crafts, choose your favorite pets to your taste.
Photo crafts animals


In order to interest the child in some creative activity, parents have to make a huge amount of effort in this direction. In the age of smartphones, tablets and other technical gadgets, it is very difficult to tear your child away from them.
Here it is extremely important to convey to the child all the benefits of the creative process, he needs to show all the advantages that he can acquire. And DIY animal crafts can easily become such an interesting element.

Made of paper or leaves, they will not just stand and gather dust on bookshelves, but will become active participants in children's games when the baby plays something.

In addition, such an application can be a good present for a friend, loved one or good friends.

Manufacturing techniques
Volumetric animal crafts made using colored paper have been and will be the most popular type of children's creativity, since the material itself is very easy to get and it is quite cheap.


But besides paper, there are other, no less interesting techniques for making crafts of this scale. These include:
- clay modeling;
- applications created with beads and multi-colored beads;
- modular origami;
- scrapbooking;
- embroidery of various animals on outerwear;
- quilling and more.

The only thing left for a person is the choice of the animal that he would like to see. This, for example, can be representatives of the Eastern calendar or animals that the child likes.

In any case, crafts on the theme of animals will always be relevant and will not lose their popularity.

Tools for the job
Before you start creating masterpieces, you need to stock up on all the tools necessary for this work. All of them can be easily bought in the same stationery store, so there should be no problems with this.

To create a beautiful animal figurine you will need:
- regular or curly scissors;
- knife for cutting paper;
- ruler (wooden or metal);
- figured hole punchers;
- ordinary tape;
- PVA glue or glue stick;
- tassel.


In addition to the basic tools, you can use other additional items, such as pencils, felt-tip pens, beads, etc., to create a cute little animal.

Instruction
If parents do not know where to start and how to do everything right, then to solve this issue, they just need to go to the global Internet.

There you can find a huge number of schemes for animal crafts, which show in detail and clearly how to make this or that animal.

Based on the information received, the creative process of parents and the child will now proceed easily and quickly, which is extremely important in the context of joint efforts.

Beads
If you want to move away from the banal options with paper, then a person should pay attention to such material as beads. Beaded animal crafts look very attractive and unusual, which allows them to be put on public display.

If these are small beadwork, then it is recommended to follow the instructions for making such a product. Now models that depict crocodiles, cats, dogs, butterflies, etc. are gaining popularity.


After a person learns how to make small beaded models well, then over time he will be able to make more voluminous and larger animals.

Beaded animals are woven using flexible wire, which is folded into horizontal circles with beads strung on it.

Thanks to the use of this technique, a home toy can acquire the desired size. For example, a beaded owlet turns out to be rather big if it is made from volumetric weaving.

And there are a lot of such examples, so there will be plenty to choose from.


Alternative materials
Looking at photos of animal crafts on the Internet, you can stumble upon cute sheep made with dough and fabric. You can present a similar craft to your loved one (keep one for yourself and give the second).

To make such a masterpiece, first you need to prepare salty dough, which will be responsible for the body of the animal. We take the same amount of flour and salt and knead the dough with water.


Then we fashion two identical cylinders from the dough with ears, nose and legs. We put the result in the oven and bake a little on very low heat.

Having received the base, we proceed to apply color additions. We paint the muzzles of animals with the help of paint, draw their eyes and pink cheeks.

"Wool" is also very easy to make. We take faux fur or a fabric of a similar type, twist it (using the quilling technique) and glue it onto the dough.

Other types of crafts
Also, very often you can find animals made from fruits, vegetables, cones, berries, leaves and other natural autumn components.

The most common crafts:

- figures of animals from cones and plasticine, combined into a common composition,
- owls made of pumpkin;
- piglets from potatoes;
- carrot men;
- caterpillar of apples and leaves;
- pear bird;
- hedgehog made from grapes and sushi sticks, etc.

If parents want to give their child a piece of beauty, then animal crafts in this case are exactly the product that is needed for this purpose.

Photo crafts animals


Simple animals for kids in engineering origami- this is entertainment for the child and an occasion for parents to teach him something new. Of the materials at hand, you only need colored one-sided paper, scissors, glue, a black pen or a felt-tip pen. The result is easily recognizable funny faces: a cat, a dog, a panda and an elephant.
How to make paper animals
Simple figures you will collect in just a few minutes. Be sure to have your child next to you. Take the necessary materials and go.
Origami panda - instructions for assembly with children
Take a black one-sided sheet of paper measuring 9x9 cm. Fold it in half in diagonal directions. Place white side out in front of you.

Focusing on one of the central folds, bend the opposite ends to the middle, not reaching the center exactly half the distance.

Fold the workpiece in half outward along the transverse strip.

Bend the lower sharp tip up. Fold the top layer down. Hide the tip inside. The panda has black ears and a nose. It remains to make the eyes. Cut out two circles from black paper and make white centers. Glue to craft.


simple paper elephant
There is nothing difficult in assembling an origami elephant head. Take a 15x15 cm gray square and do the following:
- Fold the paper in half diagonally to make a triangle. Divide it lengthwise into three equal parts so that they can be folded together and you get a figure, as in the photo.
- Bend the bottom up.
- Bend the upper end forward and down so that it is outside - this is the future trunk, and ears on the sides.
- Finish off the trunk by making a couple of folds at the top. The paper is folded like an accordion.
- Draw the animal's eyes or glue from colored paper.


Origami dog
A funny dog will turn out in just a few simple steps. Bend a one-sided brown sheet measuring 9x9 cm along a diagonal line to make a triangle.

Fold the side corners of the triangle together and iron the center fold well.

Direct the sides to the formed center so that the ends are at the top and a multilayer rhombus is obtained.


Position the workpiece - the outer ends of the rhombus are at the bottom. Bend them up at an angle.

Fold the top corner down. Turn the figure over to the other side.


Form the ears by making squares from the triangles sticking out on the sides.

Bend the bottom of the outer layer up. Point the tip down.

Turn the dog's face over to the wrong side again. Bend the free lower end up so that it is even with the outer one and is not visible on the front side. Remove the side pieces inside out.


Flip the dog's face over. Draw the eyes and mouth.


Paper cat and cat
It is difficult, touching on the theme of animals in the origami technique, to pass by cats. Let's make a cat. Repeat the same steps as with the dog until the workpiece is turned over to the other side.


The ears are ready. We fold the lower part, like a dog, bending up the outer layer. The tip is down again.


On the wrong side, hide the second lower end and side parts. Flip. Draw eyes, muzzle, mustache.


And in conclusion, an easy version of the cat. Fold the 9x9 cm orange square in half to make a triangle.

Lightly mark the middle, making a barely noticeable transverse fold. Bend the top corner to it. Lift the sides of the triangle up.


